Introduction
French toast has long been a beloved breakfast staple in kitchens around the world. Its warm, comforting flavors and delightful aromas evoke memories of family gatherings and leisurely weekend brunches. Traditionally, French toast consists of slices of bread soaked in a mixture of eggs and milk, then cooked to golden perfection on a skillet. However, as culinary creativity expands, so does the way we enjoy this classic dish. Enter the baked French toast sticks—a modern twist that is not only convenient but also family-friendly and healthier.
Baked French toast sticks offer the same delicious flavors that make traditional French toast so appealing, but they come with an added advantage: crispiness without the need for frying. This baking method allows for a lighter, less greasy version that’s perfect for busy mornings or lazy weekends when you want to whip up something special without spending hours in the kitchen. Families love them because they can be made in larger batches, making it easy to serve everyone at once. Plus, kids adore the fun finger-food aspect of French toast sticks, which can be dipped into syrup or fruit compote for an extra touch of sweetness.
In this article, we will explore how to create crispy baked French toast sticks that are sure to impress your family and friends. We will delve into the essential ingredients that bring this dish to life, along with detailed preparation steps that will guide you toward achieving breakfast perfection.
Understanding the Ingredients
To create the best crispy baked French toast sticks, it’s essential to understand the role each ingredient plays in the recipe. Let’s break down the key components:
Thick Bread Varieties
The choice of bread is crucial for achieving the perfect texture and flavor in your French toast sticks. Thick-cut varieties like brioche and challah are excellent choices. Brioche is a rich, buttery bread that lends a slight sweetness and soft texture, while challah, a traditional Jewish bread, has a slightly eggy flavor and a tender crumb. Both types of bread absorb the custard mixture beautifully, creating a deliciously rich base for your French toast sticks.
When selecting your bread, aim for slices that are at least 1 inch thick. This thickness ensures that the bread can hold up during the soaking process without becoming overly soggy, which is essential for achieving that coveted crispy exterior once baked.
The Role of Eggs and Milk
Eggs and milk are the heart of the custard mixture that coats the bread. They work together to create that signature creamy texture that French toast is known for. Eggs provide structure, richness, and moisture, while milk adds creaminess and helps to bind the ingredients together.
For a classic recipe, whole milk is typically used. However, you can easily switch to non-dairy alternatives like almond milk, oat milk, or coconut milk to accommodate dietary preferences or restrictions. When whisking your egg and milk mixture, aim for a smooth, homogenous blend that ensures every slice of bread is evenly coated.
Enhancing Flavor with Vanilla Extract and Cinnamon
To elevate the flavor of your French toast sticks, vanilla extract and ground cinnamon are must-have ingredients. Vanilla extract adds a warm, aromatic quality that complements the sweetness of the bread, while cinnamon introduces a delightful warmth that permeates throughout the dish. These spices not only enhance the overall flavor profile but also evoke the cozy essence of breakfast.
A good rule of thumb is to add one teaspoon of vanilla extract and a teaspoon of ground cinnamon to your custard mixture. You can adjust these amounts to suit your personal taste, but these measurements create a well-balanced flavor that pairs beautifully with the bread.
The Importance of Breadcrumbs
One of the secrets to achieving crispy baked French toast sticks is the addition of breadcrumbs, particularly panko breadcrumbs. Panko, a Japanese-style breadcrumb, is coarser and airier than traditional breadcrumbs, which allows for better crisping during the baking process. When sprinkled on top of your French toast sticks, panko creates a delightful crunch that contrasts wonderfully with the soft interior.
If you’re looking to make your French toast sticks even more indulgent, consider combining your panko breadcrumbs with a touch of brown sugar. This mixture not only adds sweetness but also helps caramelize the topping as it bakes, resulting in a beautifully golden crust.
Optional Additions: Sugar and Milk Alternatives
While the base recipe for crispy baked French toast sticks is simple and delicious, you may want to consider some optional additions to personalize your creation. Adding a bit of granulated sugar to the custard mixture can enhance the sweetness, especially if you prefer a sweeter breakfast treat. A tablespoon or two should suffice, but feel free to adjust based on your preference.
Additionally, if you’re using non-dairy milk for your custard, ensure you’re selecting a variety that is unsweetened, as this will prevent your French toast from becoming overly sweet and allow the flavors of the vanilla and cinnamon to shine through.
Preparation Steps for Perfect French Toast Sticks
Now that we understand the essential ingredients, let’s dive into the preparation steps to create these delicious baked French toast sticks. Follow these detailed instructions for the best results:
Preheating the Oven
Start by preheating your oven to 375°F (190°C). Preheating is a crucial step in baking, as it ensures a consistent cooking temperature throughout the baking process. A properly preheated oven helps the French toast sticks develop that desirable crispy exterior while keeping the interior soft and custardy.
Cutting the Bread
Next, it’s time to cut your chosen bread into sticks. Using a serrated knife, slice the bread into approximately 1-inch wide strips. This uniformity is essential for even cooking; thinner or thicker pieces may cook at different rates, leading to some sticks being undercooked or overly crispy. If you’re using a loaf of brioche or challah, you can typically cut each slice into three or four strips, depending on the size of the bread.
Whisking the Egg Mixture
In a large mixing bowl, combine your eggs, milk, vanilla extract, and cinnamon. Use a whisk to blend the ingredients thoroughly until you achieve a smooth, custard-like mixture. Be sure to whisk vigorously to incorporate air into the mixture, which will help create a light and fluffy texture once baked. If you opted to include sugar, add it to the mixture at this stage and whisk until fully dissolved.
Dipping and Coating
Once your custard is ready, it’s time to dip the bread sticks. Take each piece of bread and immerse it in the egg mixture, making sure to coat it generously on all sides. Allow the bread to soak for a few seconds to absorb the custard, but avoid letting it sit for too long, as this can lead to sogginess. After dipping, shake off any excess custard before proceeding to the next step.
Next, roll each soaked stick in the panko breadcrumb mixture, ensuring an even coating. This breadcrumb layer is what will create that delightful crunch, so take your time to cover each stick thoroughly. For added flavor, you can mix a pinch of cinnamon into the panko before coating.
Arranging on the Baking Sheet
Prepare a baking sheet by lining it with parchment paper or lightly greasing it with cooking spray to prevent sticking. Once your French toast sticks are coated, arrange them on the baking sheet in a single layer, allowing space between each stick. Proper spacing is essential for achieving maximum crispiness, as overcrowding the baking sheet can lead to steaming instead of baking.
As you arrange the sticks, consider sprinkling a little extra panko on top of each one for an additional crunch. This will give your French toast sticks a beautiful golden color as they bake.
Stay tuned for the next part of this article, where we will discuss the baking process to achieve crispy perfection and provide some serving suggestions and variations to elevate your breakfast experience!
Importance of Baking Time and Temperature
When it comes to achieving the perfect crispy baked French toast sticks, baking time and temperature are critical factors. Preheat your oven to 425°F (220°C) before you start preparing your French toast sticks. This high temperature is essential as it allows the outsides to crisp up beautifully while keeping the insides soft and custardy.
Once you place the French toast sticks in the oven, bake them for about 12-15 minutes. However, the exact time can vary based on your oven’s specifications and how thick your bread slices are. It’s advisable to check the sticks after the first 10 minutes. This way, you can monitor their progress and avoid over-baking them, which can lead to dryness.
Discussing the Flipping Process: Ensuring Even Browning on Both Sides
To achieve that coveted golden-brown exterior, flipping your French toast sticks halfway through the baking process is crucial. About 6-8 minutes into baking, gently use a spatula to turn each stick over. This ensures that both sides receive equal exposure to the heat, resulting in uniformly crispy edges. It’s a simple step that can significantly enhance the texture of your French toast sticks. When you flip them, be careful not to disturb the coating too much; a gentle lift should suffice to maintain the integrity of the bread.
Signs That the French Toast Sticks Are Done: Visual Cues to Look For
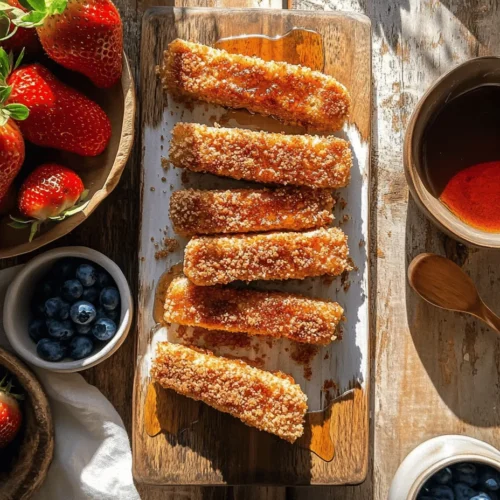
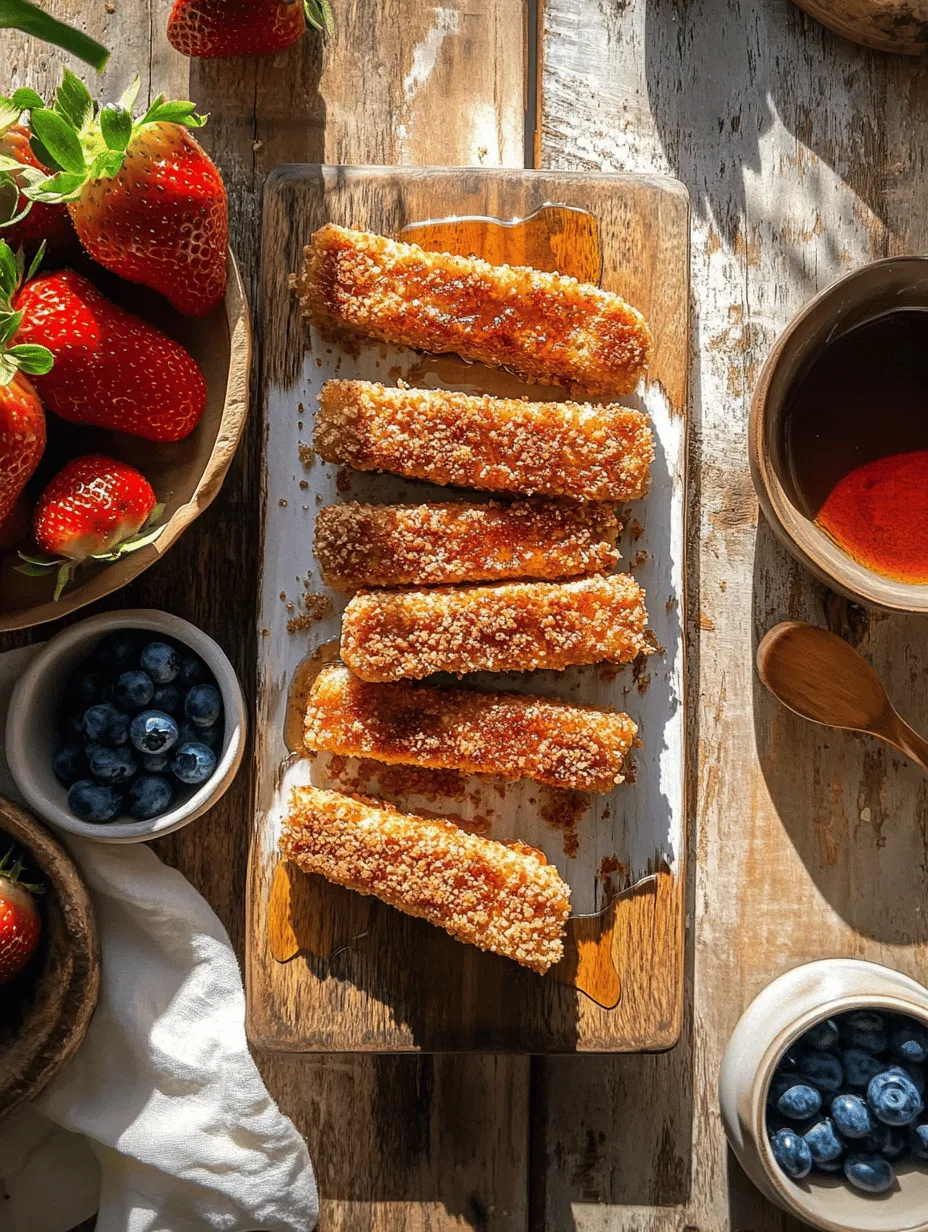
Visual cues are excellent indicators of when your French toast sticks are ready to come out of the oven. Look for a rich, golden-brown color on both sides. The edges should appear crisp, and the insides should be soft but not soggy. If you gently press on a stick, it should feel firm and spring back slightly. Additionally, if you notice a slight puffiness, that’s a great sign of perfectly baked French toast sticks.
Serving Suggestions
Once your crispy baked French toast sticks are out of the oven, it’s time to serve them up!
Ideas for Serving
The beauty of French toast sticks is their versatility when it comes to serving options. Here are some delightful suggestions:
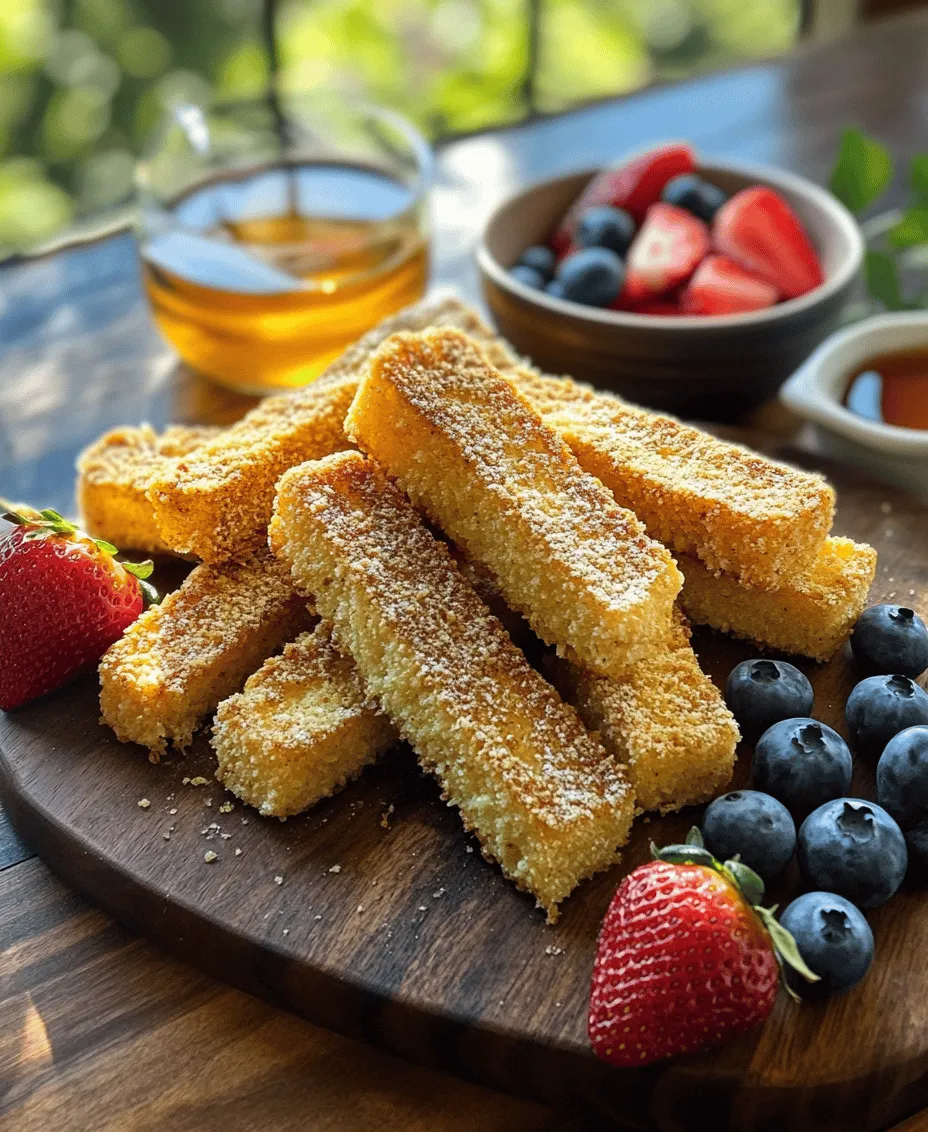
– Classic Maple Syrup Pairings: A drizzle of pure maple syrup is the classic accompaniment that perfectly complements the sweetness of the French toast. The rich, caramel-like flavor enhances the overall taste, making each bite a little more indulgent.
– Incorporating Fresh Fruit for Added Flavor and Nutrition: Fresh fruit not only adds a pop of color to your plate but also provides a burst of flavor and nutrition. Consider serving your French toast sticks with slices of strawberries, bananas, or blueberries. For a refreshing twist, a handful of raspberries or a sprinkle of pomegranate seeds can add a delightful tartness.
– Suggestions for Additional Toppings: Elevate your breakfast experience by adding other toppings. A dusting of powdered sugar can give your French toast sticks a touch of elegance, making them feel like a special treat. Whipped cream adds a luxurious texture, while a dollop of yogurt can introduce a tangy flavor that balances the sweetness perfectly.
Variations and Customizations
One of the best aspects of crispy baked French toast sticks is their adaptability. You can easily customize the recipe according to your preferences or the season.
Exploring Different Bread Options for Varied Flavors
The type of bread you use can significantly alter the flavor and texture of your French toast sticks. While traditional white bread works well, you can experiment with brioche, challah, or even whole-grain bread for added nutritional benefits. Each type of bread will lend its unique flavor and texture, making your French toast sticks even more exciting.
Suggestions for Flavoring the Egg Mixture
Enhance the flavor profile of your egg mixture by incorporating spices and extracts. Adding a pinch of nutmeg can introduce a warm, aromatic note, while some citrus zest, such as lemon or orange, can add a refreshing brightness. Flavored extracts, like vanilla or almond, can also elevate the overall taste.
Ideas for Making It Seasonal
You can easily adapt this recipe to fit the seasons. In the fall, consider adding pumpkin spice to the egg mixture for a seasonal twist. In the summer, fresh berries can serve as both a topping and an integral part of the dish, adding a fruity flair that mirrors the vibrant season.
Health Considerations
While crispy baked French toast sticks are a delightful treat, it’s essential to consider their nutritional content and possible dietary modifications.
Nutritional Breakdown of the Recipe
A standard serving of crispy baked French toast sticks generally contains around 200-250 calories, depending on the ingredients used. They offer a balanced mix of carbohydrates and protein, making them a satisfying breakfast option. Pairing them with fresh fruit or a side of yogurt can further enhance their nutritional value, adding vitamins, minerals, and additional protein.
Discussion of Potential Dietary Modifications
For those with dietary restrictions, there are plenty of ways to make this recipe more inclusive:
– Gluten-Free Bread Options: If you’re avoiding gluten, substitute regular bread with gluten-free varieties. Many brands offer gluten-free bread that maintains a similar texture and flavor.
– Reducing Sugar: If you’re looking to cut down on sugar, consider reducing the amount in the egg mixture or opting for a sugar substitute. You can also control the sweetness by adjusting the toppings you choose.
– Increasing Protein Content: To make your French toast sticks more filling, consider adding protein powder to the egg mixture. Alternatively, serving them with a side of Greek yogurt can significantly boost the protein content.
Balancing Indulgence with Health-Conscious Choices
The key to enjoying crispy baked French toast sticks guilt-free is balance. By making thoughtful ingredient choices and incorporating nutritious toppings, you can indulge in this delicious breakfast option without compromising your health goals.
Conclusion
Crispy baked French toast sticks offer a delightful and versatile breakfast solution that appeals to both adults and children alike. With their golden-brown exterior and soft interior, they are not only visually appealing but also satisfying to eat. The customization options are endless, allowing you to tailor the recipe to your taste preferences or seasonal ingredients.
Encouraging families to try this recipe means introducing them to a fun and easy breakfast solution that everyone can enjoy. Homemade breakfast options like these can be both delicious and healthy, fostering an atmosphere of cooking together and sharing meals. So gather the family, whip up a batch of crispy baked French toast sticks, and discover the joy of a homemade breakfast that combines flavor, nutrition, and creativity.