
Introduction
Valentine’s Day is a cherished occasion celebrated by many around the world, a day dedicated to expressing love and affection to partners, friends, and family. The tradition of sharing special meals on this day has been passed down through generations, transforming ordinary dinners into extraordinary experiences filled with romance and warmth. From heart-shaped desserts to beautifully arranged meals, the culinary possibilities are as vast as the love they signify.
One delightful addition to any Valentine’s Day feast is heart-shaped breadsticks. These whimsical breadsticks not only add a touch of fun and creativity to your dining table but also serve as a delicious accompaniment to a variety of dishes. Imagine the joy on your loved one’s face when presented with these charming, heart-shaped delights — they are sure to elevate your meal from ordinary to extraordinary.
The appeal of this recipe lies in its perfect blend of simplicity, taste, and visual charm. Made with basic pantry ingredients, heart-shaped breadsticks are accessible to cooks of all skill levels. They are soft, chewy, and infused with flavor, making them an irresistible treat. Plus, when you shape them into hearts, they become a symbol of love, perfect for the occasion.
In this article, we will guide you through the process of making these delightful heart-shaped breadsticks, ensuring that your Valentine’s Day celebration is as special as it should be.
Understanding the Ingredients
To create the perfect heart-shaped breadsticks, understanding the role of each ingredient is essential. Here’s a detailed look at the key components:
All-Purpose Flour
All-purpose flour is the backbone of this recipe, providing the structure and texture necessary for the breadsticks. Its moderate protein content allows for the development of gluten, which gives the breadsticks their chewiness and helps them rise. When choosing flour, make sure it’s fresh to ensure the best results.
Active Dry Yeast
Active dry yeast is critical for leavening the breadsticks, allowing them to rise and achieve a light, airy texture. When activated correctly, yeast ferments the sugars in the dough, releasing carbon dioxide gas that causes the dough to expand. It’s essential to ensure that the yeast is fresh and properly activated to achieve optimal results.
Sugar
Sugar plays a dual role in this recipe. Firstly, it acts as food for the yeast, helping to activate it and promote fermentation. Secondly, it adds a hint of sweetness to the breadsticks, enhancing their flavor profile. A small amount of sugar is all you need to provide the necessary boost to the yeast without making the breadsticks overly sweet.
Salt
Salt is often termed the “forgotten ingredient” in baking, but it plays a vital role in flavor enhancement and balance. It not only enhances the taste of the breadsticks but also regulates the yeast’s activity, ensuring that the fermentation process occurs at a controlled pace. This balance is crucial for achieving the best texture and flavor.
Warm Water
Warm water is essential for activating the yeast. The optimal temperature for yeast activation is between 100°F to 110°F (37°C to 43°C). If the water is too hot, it can kill the yeast; if it’s too cold, the activation process will be slow. Using a kitchen thermometer can help ensure the water is at the right temperature for the best results.
Olive Oil
Olive oil adds moisture to the dough, contributing to a tender crumb and enhancing the flavor of the breadsticks. It also helps to create a beautiful golden crust during baking. Using high-quality extra virgin olive oil can enhance the overall taste of your breadsticks.
Garlic Powder and Dried Italian Herbs
For a flavor boost, garlic powder and dried Italian herbs (such as oregano and basil) are included in the recipe. These ingredients infuse the breadsticks with a savory aroma and taste, making them a perfect accompaniment to any Italian-inspired dish or as a standalone snack.
Egg Wash
An egg wash, typically made from a beaten egg mixed with a little water, is brushed on the surface of the breadsticks before baking. This step is crucial as it gives the breadsticks a beautiful golden color and a shiny sheen, making them visually appealing on your Valentine’s Day table.
Optional Toppings
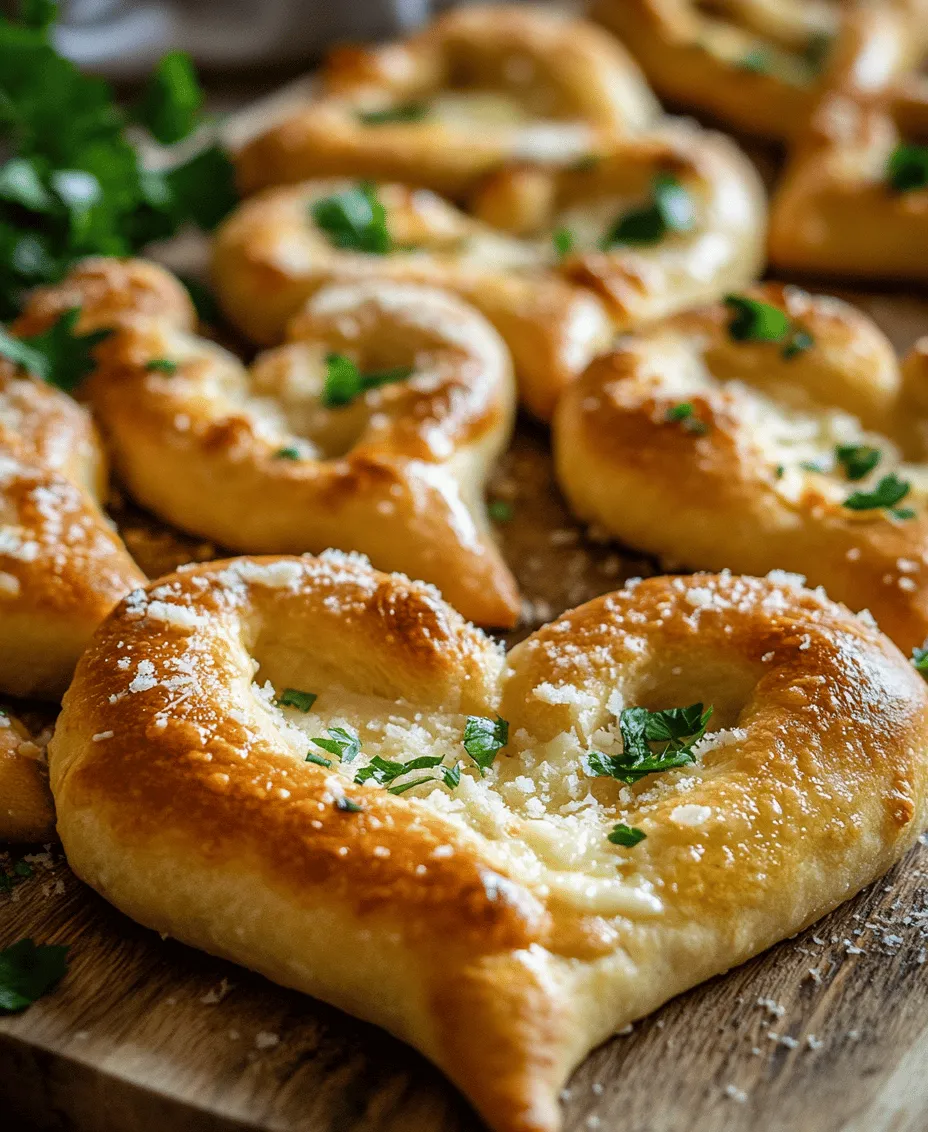
To elevate the flavor and presentation of your heart-shaped breadsticks, consider adding optional toppings like grated Parmesan cheese or fresh herbs. These toppings can add depth to the flavor profile and make your breadsticks even more enticing.
Step-by-Step Instructions
Activation of the Yeast
The first step in making heart-shaped breadsticks is to activate the yeast. This step is crucial for ensuring that your dough rises properly, resulting in fluffy and light breadsticks. Begin by measuring out the warm water into a mixing bowl. Add the sugar and then sprinkle the active dry yeast over the top. Allow this mixture to sit for about 5-10 minutes until it becomes frothy. The froth indicates that the yeast is alive and ready to work its magic in the dough.
Tips for Recognizing When Yeast is Activated
– Look for bubbles or foam forming on the surface of the water. This indicates that the yeast is consuming the sugar and producing carbon dioxide.
– If the mixture does not foam after 10 minutes, it may indicate that the yeast is expired or that the water temperature was not optimal. In this case, it’s best to start over with fresh yeast and properly warmed water.
Preparing the Dough
Once the yeast is activated, it’s time to prepare the dough. In a large mixing bowl, combine the all-purpose flour and salt, mixing them well. Next, create a well in the center of the flour mixture. Pour the frothy yeast mixture into this well, followed by the olive oil.
Using a wooden spoon or your hands, gently mix the ingredients together until they form a shaggy dough. It’s important to combine the wet and dry ingredients thoroughly, but you don’t need to knead at this stage.
Techniques for Optimal Blending
– Start by slowly incorporating the flour into the wet ingredients from the edges of the well.
– Use a gentle folding motion to combine the ingredients without overworking the dough, which can lead to a dense texture.
Kneading the Dough
After the dough comes together, it’s time to knead it. Dust a clean surface with a light sprinkle of flour and transfer the dough onto this surface. Kneading is essential for developing gluten, which gives the breadsticks their structure and chewiness.
To knead, press the dough down with the palms of your hands, fold it over, and then push it down again. Rotate the dough a quarter turn and repeat this process for about 8-10 minutes. You’ll know the dough is adequately kneaded when it becomes smooth and elastic, bouncing back when you press it gently with your finger.
Visual Cues for Determining When the Dough is Adequately Kneaded
– The surface of the dough should be smooth and not sticky.
– When you stretch a small piece of dough, it should hold its shape without tearing easily.
By following these steps, you will create a delicious and visually appealing heart-shaped breadstick that is sure to impress your loved ones this Valentine’s Day. Stay tuned for the next part, where we will shape, bake, and enjoy these delightful breadsticks, making your celebration even more special.
Letting the Dough Rise
After kneading, it’s time to let your dough rise, a crucial step that allows it to develop flavor and achieve a light, airy texture. For optimal results, place your kneaded dough in a warm, draft-free area. The ideal temperature for dough rising is between 75°F to 80°F. If your kitchen is cooler, there are several methods to create a warm environment for your dough.
1. Oven Method: Preheat your oven to about 200°F for a few minutes, then turn it off. Place the covered bowl of dough inside the oven with the door slightly ajar.
2. Stovetop Method: If you have a stove with a pilot light, you can place your dough near the stove. The residual heat will help it rise.
3. Warm Water Method: Place your bowl of dough inside a larger bowl filled with warm water. Make sure the water isn’t too hot, which could kill the yeast.
To determine when your dough has properly risen, look for it to double in size and feel light and airy to the touch. A simple test is to gently poke the dough; if the indentation remains, it’s ready for the next step.
Shaping the Breadsticks
Once your dough has risen, it’s time to shape those delightful heart-shaped breadsticks. Begin by lightly flouring your work surface to prevent sticking.
1. Dividing the Dough: Gently punch down the risen dough to release excess air. Divide the dough into equal portions, typically about 12 to 16 pieces, depending on how large you want your breadsticks to be. Each piece should weigh approximately 1 ounce for uniform breadsticks.
2. Rolling the Dough: Take one piece of dough and roll it into a long rope, about 10 to 12 inches in length. Use your palms and fingers to gently stretch and roll the dough evenly. If the dough resists stretching, let it rest for a couple of minutes before continuing.
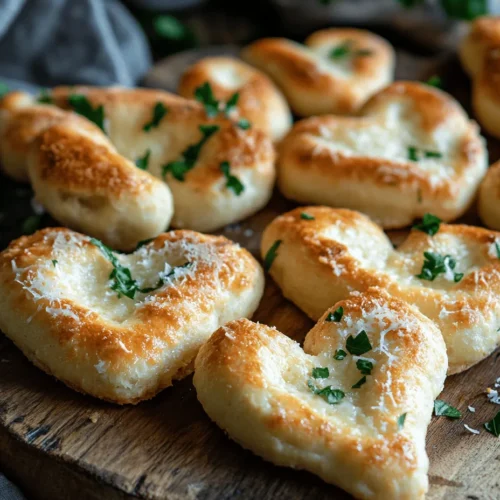
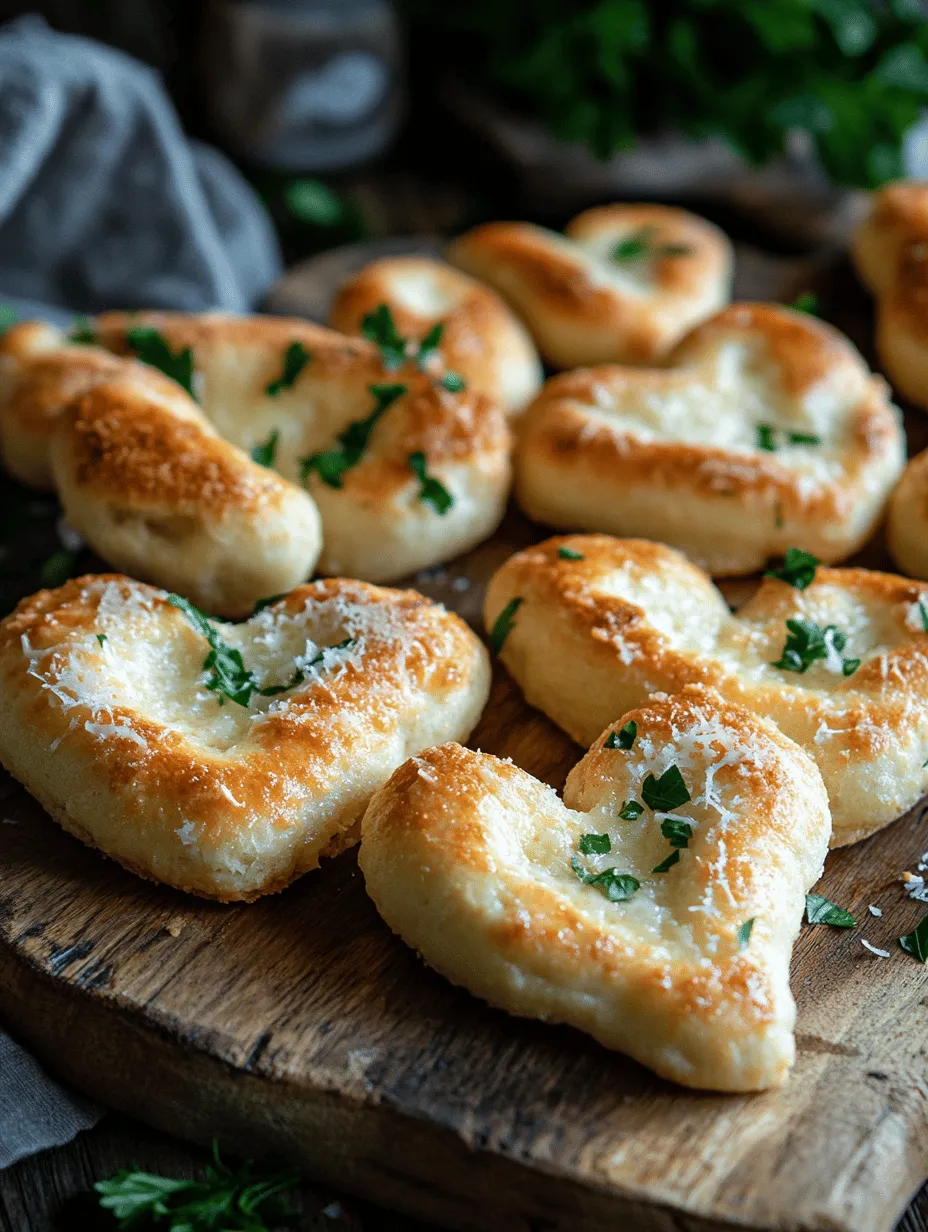
3. Shaping into Hearts: To form the heart shape, start by creating a small loop at one end of the rope—this will be the top point of the heart. Then, take the other end and curve it around to meet the loop, pressing the ends together to seal. This technique not only creates a visually appealing shape but also ensures the heart maintains its form during baking.
The aesthetics of your food presentation play a significant role in its enjoyment. The heart shape adds a touch of romance, making these breadsticks perfect for Valentine’s Day.
Preparing for Baking
Before you bake your heart-shaped breadsticks, it’s essential to prepare your baking surface. Line a baking sheet with parchment paper. This not only prevents sticking but also helps achieve an even bake, ensuring a crispy exterior.
Next, apply an egg wash for a beautiful golden finish. To make an egg wash, whisk one egg with a tablespoon of water until well combined. Using a pastry brush, gently coat the tops of the breadsticks with the egg wash. This step adds shine and enhances the overall appearance of your breadsticks.
Baking the Breadsticks
Preheat your oven to 375°F, ensuring it’s at the right temperature for optimal baking results. Once the oven is preheated, place your baking sheet in the center of the oven.
Baking usually takes about 12 to 15 minutes. Look for visual cues to determine doneness: the breadsticks should be golden brown and sound hollow when tapped on the bottom. Allow them to cool for a few minutes on the baking sheet before transferring them to a wire rack.
Garnishing and Serving
Presentation is key when it comes to serving your heart-shaped breadsticks. Arrange them on a decorative plate or in a basket lined with a colorful cloth for a romantic touch.
To elevate the experience, consider serving your breadsticks with a selection of dipping sauces. Options like marinara, garlic butter, or a savory herb-infused olive oil pair beautifully with the warm, freshly baked breadsticks, enhancing their flavor and making for a delightful snacking experience.
The Significance of Homemade Breadsticks on Valentine’s Day
Homemade gifts hold a special place in our hearts, particularly on occasions like Valentine’s Day. They symbolize thoughtfulness, effort, and love. Cooking for someone is a universal way to express care, and homemade breadsticks can convey that sentiment perfectly.
Culturally, sharing food is often seen as a way to bond and connect with others. Whether it’s a romantic dinner or a family gathering, the act of preparing and sharing a meal fosters a sense of community and love. Moreover, cooking together can strengthen relationships, creating lasting memories as you knead the dough and shape the breadsticks side by side.
Nutritional Information
When considering the nutritional benefits of your heart-shaped breadsticks, keep in mind the ingredients used. Flour provides carbohydrates for energy, while yeast contributes beneficial probiotics that promote gut health. Olive oil, often used in bread recipes, is a healthy fat that supports heart health.
For those with dietary restrictions, options like gluten-free flour blends can be used to create a gluten-free version of these breadsticks. Additionally, plant-based alternatives to eggs, such as aquafaba or flaxseed meal, can be used for the egg wash, making the recipe suitable for vegans.
Conclusion
Creating heart-shaped breadsticks for Valentine’s Day is not just about the food; it’s a heartfelt gesture that brings joy to both the maker and the recipient. This simple yet delightful recipe offers a unique way to express love and appreciation, making it a perfect addition to your Valentine’s Day celebration.
As you embark on this culinary adventure, consider personalizing the recipe with your favorite spices or herbs to make it truly your own. Making heart-shaped breadsticks can become a cherished family tradition, one that brings everyone together in the kitchen and at the dining table. Ultimately, the experience of cooking and sharing food with loved ones is what makes these moments truly special.