Introduction
In the fast-paced world we live in, finding quick and nutritious snack options can be a challenge. Whether you are a busy professional, a student juggling classes, or a parent managing a household, the need for convenient yet healthy snacks is universal. Enter the Easiest Microwave Chewy Peanut Butter Granola Bars – a delightful treat that combines the wholesome goodness of rolled oats with the richness of peanut butter and the sweetness of honey or maple syrup. These bars are not just easy to prepare; they also offer a world of customization to cater to your unique taste preferences.
Granola bars have become a staple in many households for their portability and versatility. They serve as an excellent option for breakfast on the go, a midday energy boost, or a satisfying post-workout snack. The beauty of making your granola bars at home lies in the ability to control the ingredients, ensuring that you are consuming wholesome, nutritious components without unwanted additives or preservatives found in many store-bought varieties.
In this article, we will delve into the details of this simple recipe, explore its nutritional benefits, and provide guidance on how to make the most of your homemade granola bars. With just a few basic ingredients and a microwave, you can whip up a batch of chewy, delicious bars that the whole family will love. Let’s get started!
Understanding the Ingredients
To create the perfect Easiest Microwave Chewy Peanut Butter Granola Bars, it’s essential to understand the role each ingredient plays in the recipe. Below, we explore the core components that make these granola bars not only tasty but also nutritious.
Rolled Oats: The Base of Your Granola Bars
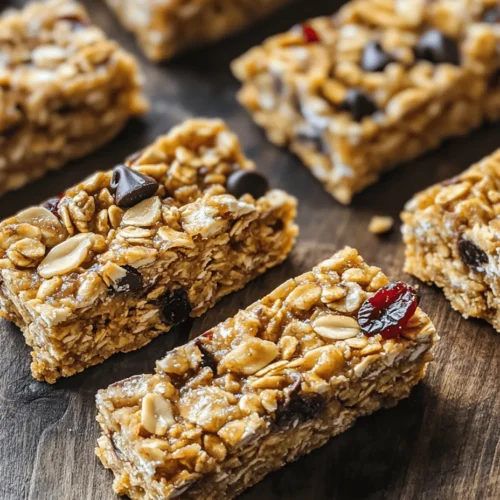
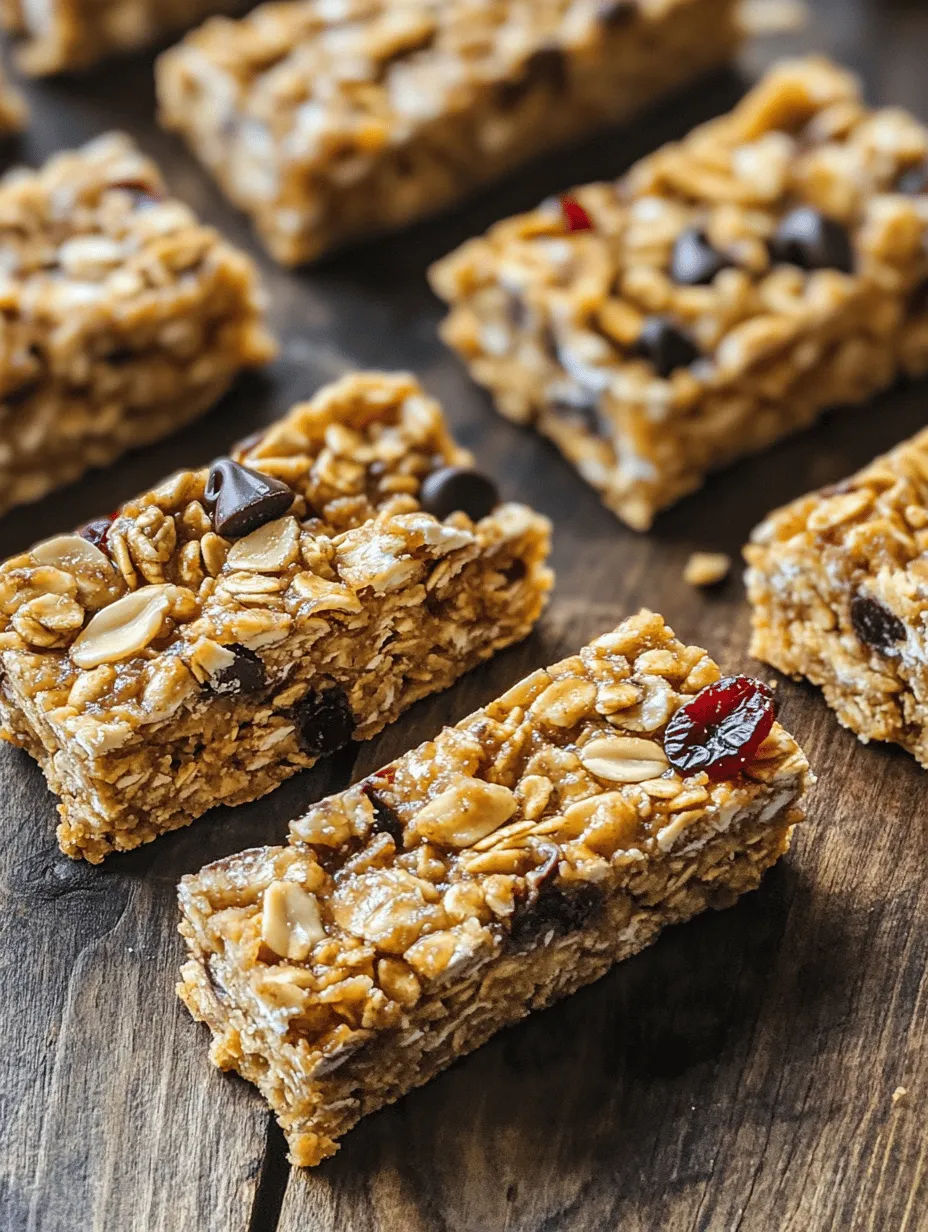
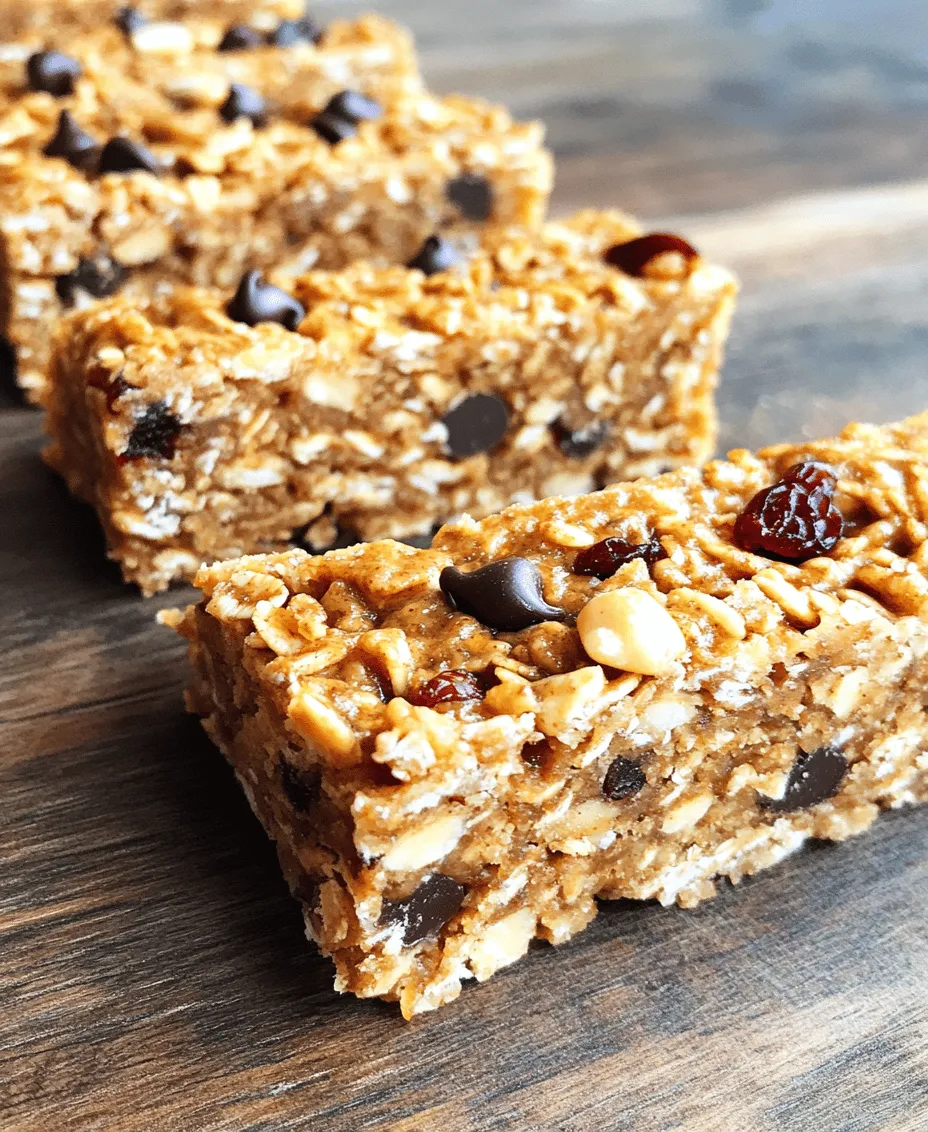
Rolled oats are the heart of any granola bar recipe, providing the structure and texture that holds the bars together. They are an excellent source of dietary fiber, which can help improve digestion and keep you feeling full. Additionally, oats are rich in essential nutrients such as manganese, phosphorus, magnesium, and iron. The use of rolled oats ensures that the bars have a chewy consistency while still being easy to digest.
When selecting oats, opt for old-fashioned rolled oats rather than quick oats. Quick oats may lead to a mushier texture in your granola bars, while rolled oats provide the right chewiness and maintain their structure during the mixing and setting process.
Peanut Butter: A Source of Healthy Fats and Protein
Peanut butter is the star ingredient in this recipe, offering a rich flavor and creamy texture that is hard to resist. It is packed with healthy fats and protein, making it a great addition to your diet. The fats in peanut butter are primarily monounsaturated, which are known to be heart-healthy. Furthermore, peanut butter contains essential vitamins and minerals, including vitamin E, magnesium, and potassium.
When choosing peanut butter for your granola bars, you have the option of using creamy or crunchy varieties. Creamy peanut butter will give you a smooth texture, while crunchy peanut butter adds delightful bits of peanuts for added texture and flavor. Be sure to select natural peanut butter that contains minimal ingredients—ideally just peanuts and salt—to avoid added sugars and oils.
Sweeteners: Honey vs. Maple Syrup
Sweeteners play a crucial role in balancing the flavors of your granola bars. In this recipe, you can choose between honey and maple syrup, each offering its unique taste and health benefits.
– Honey: A natural sweetener, honey not only adds sweetness but also brings moisture to the mixture, which helps bind the ingredients together. Honey is known for its antioxidant properties and can provide a quick energy boost. However, it’s important to note that honey is not suitable for vegans; hence, maple syrup can be used as a substitute.
– Maple Syrup: This vegan-friendly alternative offers a distinct flavor profile and is also rich in antioxidants. Maple syrup has a lower glycemic index than honey, making it a better choice for those watching their blood sugar levels. The choice between honey and maple syrup ultimately comes down to personal preference and dietary restrictions.
Optional Add-ins: Enhancing Flavor and Nutrition
While the core ingredients are essential for the basic recipe, optional add-ins can elevate your granola bars’ flavor and nutritional profile. Consider incorporating any of the following:
– Chocolate Chips: Semi-sweet or dark chocolate chips can add a hint of indulgence to your bars. The addition of chocolate not only enhances the flavor but also provides antioxidants.
– Nuts: Chopped nuts such as almonds, walnuts, or pecans add crunch and healthy fats. Nuts are also a great source of protein and fiber.
– Dried Fruits: Adding dried fruits like cranberries, raisins, or apricots can introduce natural sweetness and chewiness to your granola bars. Dried fruits are rich in vitamins and can provide an extra burst of flavor.
– Seeds: Incorporating seeds like chia, flax, or pumpkin seeds can boost the nutritional value, providing omega-3 fatty acids and additional fiber.
These optional ingredients allow you to customize your granola bars to suit your taste and dietary needs, making them a versatile snack for everyone in the family.
Step-by-Step Instructions for Perfect Granola Bars
Now that we have a solid understanding of the ingredients, let’s move on to the step-by-step instructions for preparing your Easiest Microwave Chewy Peanut Butter Granola Bars. Follow these simple steps to create delicious, homemade granola bars that are sure to impress.
Preparing the Peanut Butter Mixture
The first step in making your granola bars is to prepare the peanut butter mixture. This mixture will serve as the binding agent for your granola bars, ensuring that all the ingredients come together seamlessly.
1. Choose a Microwave-Safe Bowl: Start by selecting a large microwave-safe bowl. This is where you will combine your peanut butter and sweetener. A glass or ceramic bowl works best to withstand the heat.
2. Combine Peanut Butter and Sweetener: Measure out your desired amount of peanut butter and add it to the bowl. Next, pour in your chosen sweetener—honey or maple syrup.
3. Microwave for Easy Mixing: Place the bowl in the microwave and heat the mixture for about 30-45 seconds, or until the peanut butter is slightly melted and the mixture is easy to stir. This will help achieve a smooth consistency, making it easier to combine with the dry ingredients.
4. Stir Until Smooth: Remove the bowl from the microwave and stir the peanut butter and sweetener together until fully combined. If the mixture is too thick, you can microwave it for an additional 15 seconds to help it mix better.
Mixing Dry Ingredients
Once your peanut butter mixture is ready, it’s time to focus on the dry ingredients. This step is crucial to ensure that the oats and any optional add-ins are well combined before mixing with the wet ingredients.
1. Measure Your Rolled Oats: Use a measuring cup to scoop out the required amount of rolled oats. Make sure to level off the top for an accurate measurement.
2. Add Optional Mix-Ins: If you’ve decided to include any optional ingredients like chocolate chips, nuts, or dried fruits, measure them out and add them to the oats. This is the time to get creative! You can experiment with different combinations to discover your favorite flavors.
3. Toss to Combine: Using a large spoon or spatula, gently mix the oats and optional add-ins together until evenly distributed. This step ensures that every bite of your granola bars will be flavorful and satisfying.
Combining Wet and Dry Ingredients
With both the peanut butter mixture and dry ingredients prepared, it’s time to bring everything together. This step is critical for achieving the perfect chewy texture.
1. Pour Peanut Butter Mixture Over Oats: Carefully pour the warm peanut butter mixture over the combined dry ingredients in your mixing bowl.
2. Mix Thoroughly: Using a spatula, mix the wet and dry ingredients together until all the oats are evenly coated with the peanut butter mixture. You want to ensure that no dry spots remain, as this will impact the texture of your final granola bars.
3. Be Gentle but Firm: As you mix, be gentle to avoid breaking apart the oats, but be firm enough to ensure everything is well combined. If needed, use your hands to knead the mixture gently, ensuring all ingredients stick together.
Setting the Granola Bars
Now that your mixture is combined, it’s time to set your granola bars. Properly setting the bars is essential for achieving the right texture and making them easy to cut later on.
1. Prepare Your Baking Dish: Line an 8×8-inch or 9×9-inch baking dish with parchment paper. This will prevent the granola bars from sticking and make for easy removal once they are set.
2. Transfer the Mixture to the Dish: Spoon the granola mixture into the lined baking dish.
3. Press Down Firmly: Using the back of a spatula or your hands, press the mixture down firmly into the dish. The more compact the mixture is, the better the bars will hold together once set. Ensure an even thickness throughout the dish.
4. Microwave to Set: Place the baking dish in the microwave and heat for about 1 minute. This step helps to set the bars and meld the flavors together. You may need to adjust the microwave time depending on your microwave’s wattage, but be careful not to overcook.
Cooling and Cutting Techniques
After your granola bars are set, it’s crucial to allow them to cool properly before cutting. This step ensures that they maintain their shape and texture.
1. Let Them Cool: Remove the baking dish from the microwave and allow the granola bars to cool completely at room temperature. This will take about 30-45 minutes.
2. Chill for Better Cutting: For best results, you can place the dish in the refrigerator for an additional 15-20 minutes. Chilling helps firm up the bars, making them easier to slice.
3. Cutting the Bars: Once cooled, use a sharp knife to cut the granola into bars or squares. For even pieces, measure and mark where you plan to cut before slicing.
4. Store Properly: Store your granola bars in an airtight container. They can be kept at room temperature for up to a week, or in the refrigerator for longer freshness.
Creating your own Easiest Microwave Chewy Peanut Butter Granola Bars is a straightforward process that yields delicious results. With a little preparation and the right ingredients, you can enjoy a wholesome snack that is both satisfying and nutritious. In the next section, we will explore some useful tips and tricks to ensure you achieve the best results with your granola bars.
Tools and Methods for Cutting Uniform Bars
To achieve perfectly uniform granola bars, having the right tools and techniques is essential. Here are some methods to ensure your granola bars are cut evenly:
1. Use a Sharp Knife: A sharp chef’s knife or a serrated knife will give you cleaner cuts. Dull knives tend to crush the bars instead of slicing through them, which can lead to uneven pieces.
2. Line Your Pan: Before pouring in the granola mixture, line your baking dish with parchment paper. This not only prevents sticking but also allows you to easily lift the bars out once they have cooled, making cutting easier.
3. Cool Completely: Allow the granola bars to cool thoroughly in the refrigerator for at least 30 minutes before cutting. This helps the bars set up well, making them easier to slice without crumbling.
4. Mark Your Cuts: For perfectly sized bars, measure and mark where you will cut the granola before you actually slice it. Use a ruler to ensure that each piece will be the same size, or simply use the knife to lightly score the surface.
5. Use a Pizza Cutter: For an alternative cutting method, a pizza cutter can work wonders. Its rolling motion helps to cut through the bars smoothly, providing a uniform shape without much effort.
Nutritional Benefits of Homemade Granola Bars
Homemade granola bars are not just a tasty treat; they are also packed with nutritional benefits. Let’s delve into the health benefits of the key ingredients used in the Easiest Microwave Chewy Peanut Butter Granola Bars:
Health Benefits of Key Ingredients
– Fiber Content from Oats: Oats are a fantastic source of dietary fiber, which plays a key role in digestive health. Fiber helps to maintain bowel regularity and can aid in preventing constipation. Furthermore, it promotes satiety and can assist in weight management. The soluble fiber found in oats also helps to lower cholesterol levels, contributing to heart health.
– Protein and Healthy Fats from Peanut Butter: Peanut butter is not only a delicious addition but also a nutritional powerhouse. It is rich in protein, essential for muscle repair and growth, making these bars an excellent post-workout snack. Additionally, peanut butter contains healthy fats, which are important for maintaining energy levels and overall health. These fats also support heart health and help to absorb fat-soluble vitamins.
– Nutritional Value of Optional Add-Ins: Optional ingredients like nuts and dried fruits can elevate the nutritional profile of your granola bars. Nuts provide additional protein, healthy fats, and important vitamins and minerals. Dried fruits, while being a natural source of sweetness, also contribute vitamins, antioxidants, and fiber. Incorporating a variety of these add-ins not only enhances flavor but also boosts the overall health benefits.
Comparing Homemade vs. Store-Bought Granola Bars
When it comes to choosing granola bars, homemade options offer significant advantages over store-bought varieties:
– Analysis of Ingredients Found in Commercial Bars: Many commercial granola bars are laden with added sugars, preservatives, and artificial ingredients. Often, they contain high fructose corn syrup and other sweeteners that can detract from their health benefits. By making your own granola bars, you can control the quality and quantity of ingredients, ensuring they are wholesome and nutritious.
– Cost-Effectiveness and Health Advantages: Homemade granola bars can be much more cost-effective than their store-bought counterparts. Purchasing ingredients in bulk often cuts costs, and you can make a larger batch that lasts longer. Additionally, by preparing granola bars at home, you avoid the hidden costs of unhealthy additives, making it a win-win for your health and wallet.
Creative Variations of the Easiest Microwave Chewy Peanut Butter Granola Bars
One of the best aspects of the Easiest Microwave Chewy Peanut Butter Granola Bars is their versatility. You can easily customize them to suit your taste preferences and dietary needs.
Exploring Flavor Combinations
– Alternative Nut Butters: While peanut butter is delicious, there are many other nut butters that can be used to create unique flavor profiles. Consider almond butter or cashew butter for a different taste experience. Each nut butter brings its own set of nutrients and flavors, allowing you to enjoy a variety of granola bars.
– Adding Spices: Incorporating spices like cinnamon or nutmeg can add warmth and depth to your bars. These spices are not only flavorful but also come with their own health benefits, such as anti-inflammatory properties.
Seasonal Additions
– Incorporating Seasonal Ingredients: Depending on the time of year, you can make your granola bars even more exciting. In the autumn, for instance, adding pumpkin puree not only brings a warm, cozy flavor but also boosts the nutritional content with vitamins A and C.
– Using Fresh Fruits: Instead of dried fruits, consider using fresh fruits like bananas or berries. They add moisture and natural sweetness, providing a refreshing twist to your granola bars. Just be mindful that fresh fruits may alter the texture slightly, so adjust the dry ingredients accordingly.
Storage and Shelf Life of Granola Bars
To enjoy your homemade granola bars at their best, proper storage is essential.
Optimal Storage Conditions
– Best Practices for Storing Granola Bars: To maintain the freshness of your granola bars, store them in an airtight container. This will prevent air from making them stale. If you live in a warm climate, consider refrigerating the bars to keep them from becoming too soft.
– Discussing the Use of Airtight Containers: Using glass or BPA-free plastic airtight containers is ideal for storing granola bars. You can also individually wrap them in parchment paper or plastic wrap for grab-and-go convenience.
Understanding Shelf Life
– How Long Homemade Granola Bars Last: When stored properly, homemade granola bars can last up to two weeks at room temperature. If refrigerated, they can last up to a month. However, they may lose some of their chewiness over time.
– Signs of Spoilage: Always check for signs of spoilage before consuming your granola bars. If you notice any off smells, discoloration, or changes in texture, it’s best to discard them to avoid any health risks.
Conclusion
In conclusion, the Easiest Microwave Chewy Peanut Butter Granola Bars are a versatile and nutritious snack that can be easily tailored to fit your dietary needs and flavor preferences. With minimal preparation time and simple ingredients, these granola bars are perfect for breakfast on the go, a midday snack, or a post-workout treat. By making your own at home, you not only gain the satisfaction of creating a delicious product but also have control over the ingredients, ensuring a healthier option for you and your family. Embrace the joy of homemade snacks and enjoy the wholesome goodness of peanut butter granola bars.