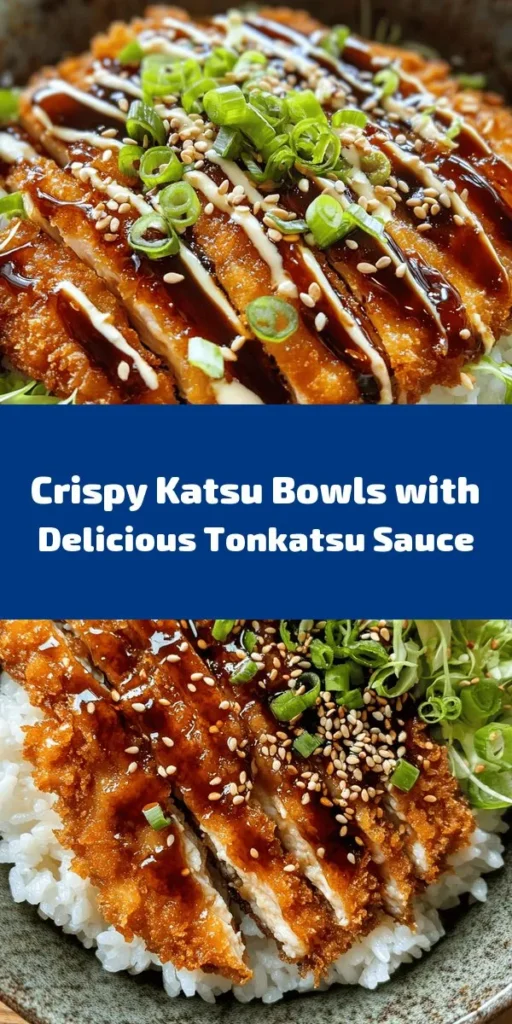
The culinary world is rich with flavors, and one dish that stands out for its satisfying crunch and savory depth is the Katsu Bowl. Originating from Japan, this delightful meal features crispy fried meat served over a generous bed of rice, accompanied by fresh vegetables and a tangy sauce. The word “Katsu” itself is derived from “katsuretsu,” meaning cutlet, and typically refers to a deep-fried breaded meat dish that has become a beloved staple in Japanese cuisine. In this article, we will explore the intricacies of preparing the perfect Crispy Katsu Bowls with Savory Tonkatsu Sauce, detailing each step from crafting the sauce to assembling the dish. Whether you’re a seasoned chef or a novice in the kitchen, this guide will provide you with the expertise to create a deliciously authentic Katsu Bowl experience at home.
Understanding Katsu and Its Cultural Significance
Katsu’s origins can be traced back to the late 19th century, during the Meiji era when Western culinary practices began to influence Japanese cuisine. The introduction of breaded and fried meat dishes was inspired by the Western cutlet, but the Japanese adapted this concept by incorporating local flavors and ingredients. Today, Katsu isn’t just a meal; it represents the seamless blend of tradition and modernity in Japanese gastronomy.
In Japanese culture, Katsu is more than just food; it symbolizes victory and success. The word “katsu” () translates to “to win” in Japanese, making it a popular choice for celebratory meals, particularly among students during exam seasons. The comfort and satisfaction derived from a Katsu Bowl make it an ideal dish for those seeking both nourishment and a sense of accomplishment.
Katsu has also inspired numerous variations around the world, such as the popular “chicken katsu” in Hawaii, where it is often served with a side of macaroni salad and rice, or the “katsu sandwich” that has gained traction in Western cuisine. Regardless of the variation, the essence of crispy, savory goodness remains at the heart of the dish.
Ingredients Breakdown for Katsu Bowls
To create the ultimate Katsu Bowl, understanding the essential components of the dish is crucial. Here’s a breakdown of the key ingredients you’ll need to create crispy Katsu Bowls with savory Tonkatsu sauce.
Tonkatsu Sauce: A Flavor-Packed Blend
Tonkatsu sauce is a thick, tangy condiment that elevates the flavors of the Katsu. It typically consists of a blend of soy sauce, Worcestershire sauce, ketchup, and various spices, creating a perfectly balanced flavor profile that complements the crispy meat. This sauce is often compared to barbecue sauce but with a unique Japanese twist that makes it a must-have for any Katsu Bowl.
The Choice of Protein: Pork Chops vs. Chicken Breasts
While traditional Katsu is made with pork cutlets, the choice of protein can vary based on personal preference. Pork chops, particularly loin chops, provide a rich flavor and tender texture when cooked properly. On the other hand, chicken breasts are a leaner option that can also be transformed into a delightful Katsu. Whichever protein you choose, the key is to ensure it is of high quality for the best results.
The Significance of Panko Breadcrumbs for Texture
One of the defining characteristics of Katsu is the use of panko breadcrumbs, which are coarser and lighter than regular breadcrumbs. This unique texture allows for a crunchier, more satisfying exterior once fried. Panko is made from crustless bread, giving it an airy quality that absorbs less oil while cooking, resulting in a lighter yet crispy coating. When preparing Katsu, using panko breadcrumbs is essential for achieving that authentic crunch.
Choosing the Right Rice for Authenticity
Serving Katsu over rice is a traditional practice, and selecting the right type of rice is vital for authenticity. Short-grain Japanese rice, such as sushi rice, is preferred for its sticky texture, which allows it to hold together well on the plate. This type of rice absorbs flavors beautifully and provides a comforting base for your Katsu and sauce.
Fresh Vegetables: Cabbage and Green Onions
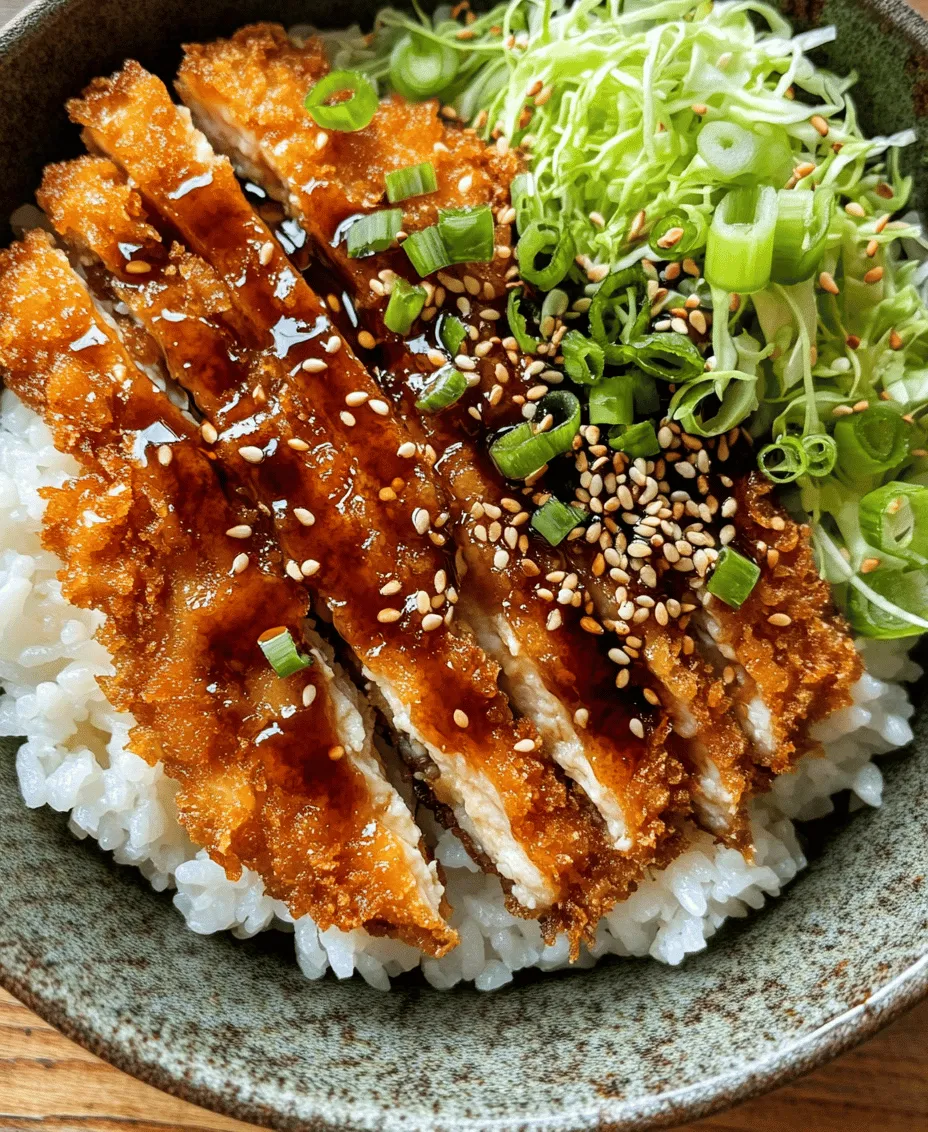
To balance the richness of the fried meat, fresh vegetables are a must-have in a Katsu Bowl. Finely shredded cabbage adds a refreshing crunch and a slight peppery flavor, while green onions provide a burst of freshness and color. These vegetables not only enhance the dish’s presentation but also contribute to a well-rounded meal.
Crafting the Perfect Tonkatsu Sauce
Creating homemade Tonkatsu sauce is relatively straightforward and well worth the effort. This flavorful condiment takes the Katsu experience to another level. Here’s a step-by-step guide to crafting the perfect sauce.
1. Gather Your Ingredients: The foundational ingredients for Tonkatsu sauce include:
– 1/2 cup ketchup
– 1/4 cup Worcestershire sauce
– 2 tablespoons soy sauce
– 1 tablespoon sugar
– 1 tablespoon Dijon mustard
– 1 teaspoon garlic powder
– 1 teaspoon ground ginger
– A pinch of black pepper
2. Combine Ingredients: In a medium-sized bowl, combine all the ingredients. Whisk them together until you achieve a smooth and uniform consistency. The blending of sweet, sour, and umami flavors is what makes this sauce truly special.
3. Taste and Adjust: Once your sauce is mixed, taste it. If you prefer a sweeter sauce, add a touch more sugar. For a tangier flavor, consider incorporating additional Worcestershire sauce. The beauty of homemade Tonkatsu sauce lies in its adaptability to your personal taste.
4. Storage Tips: Store your homemade Tonkatsu sauce in an airtight container in the refrigerator. It can last for several weeks, making it a convenient staple to have on hand for various dishes, not just Katsu.
Preparing the Tonkatsu: The Art of Frying
Now that we have our sauce ready, it’s time to focus on the star of the show—the Tonkatsu. The frying process is where the magic happens, and mastering this technique is crucial for achieving the perfect crispy exterior. Here’s how to prepare your Tonkatsu step-by-step.
Techniques for Flattening the Meat
1. Preparation: Begin by selecting your pork or chicken cutlets. If using pork, slice the loin into even pieces about 1/2 inch thick. For chicken, butterfly the breast and pound it to an even thickness. This ensures that the meat cooks evenly and helps to achieve that delightful tenderness.
2. Pounding the Meat: Place the meat between two sheets of plastic wrap or parchment paper. Using a meat mallet or rolling pin, gently pound the meat until it is uniformly flattened. This not only helps tenderize the meat but also creates a larger surface area for the breading to adhere to.
Seasoning Essentials: Enhancing Flavor with Salt and Pepper
Once your meat is flattened, it’s time to season it. Lightly sprinkle both sides of the cutlet with salt and freshly ground black pepper. This step is crucial as it infuses flavor into the meat itself, ensuring that each bite is seasoned to perfection.
The Breading Process Explained
1. Prepare the Breading Station: Set up a breading station with three shallow dishes. In the first dish, place all-purpose flour. In the second dish, beat a couple of eggs. In the third, spread out the panko breadcrumbs.
2. Dredging the Meat: Take a seasoned cutlet and dip it into the flour, ensuring it is evenly coated. Shake off any excess flour. Next, dip the floured cutlet into the beaten eggs, allowing any excess egg to drip off. Finally, coat the cutlet in the panko breadcrumbs, pressing gently to ensure the breadcrumbs adhere well to the meat. Repeat this process for all pieces of meat you plan to fry.
3. Frying the Tonkatsu: In a large skillet, heat vegetable oil over medium-high heat. You’ll want enough oil to fully submerge the cutlets halfway, typically about 1/2 inch deep. Once the oil is hot (you can test it by dropping a few breadcrumbs into the oil; if they sizzle, it’s ready), carefully add the breaded cutlets to the skillet. Fry each side for 3-4 minutes or until golden brown and crispy.
4. Draining Excess Oil: Once the Tonkatsu is cooked, transfer it to a plate lined with paper towels to drain any excess oil. This step helps maintain the crispiness of the coating.
With the Tonkatsu prepared and the sauce crafted, you are now well on your way to assembling a delightful Katsu Bowl that is sure to impress. The next steps will involve bringing all these components together for a delicious presentation that honors the rich culinary tradition of this beloved dish. Stay tuned for the next part, where we will dive into assembling the Katsu Bowls and adding the finishing touches.
Importance of Panko Breadcrumbs for Crispiness
When it comes to achieving that signature crunch in your Katsu Bowl, panko breadcrumbs are non-negotiable. Unlike regular breadcrumbs, panko is made from crustless bread that is coarsely ground, resulting in larger, flakier pieces. This unique texture allows for more air pockets, which translates to a lighter and crispier coating when fried. The airy nature of panko not only enhances the crunch but also ensures that the coating adheres well to the protein, whether it’s chicken, pork, or a vegetarian alternative.
Using panko breadcrumbs will elevate your Katsu Bowl, making it a delightful experience with every bite. If you’re unable to find panko, you can make a substitute by processing crustless white bread into coarse crumbs, but nothing quite matches the authentic texture of store-bought panko.
Frying Tips: Achieving the Perfect Golden-Brown Crust
Frying is an art that requires attention to detail, especially when you’re aiming for that perfect golden-brown crust. Here are some essential tips to ensure your Katsu is fried to perfection:
1. Temperature Control: It’s crucial to maintain the oil temperature between 350°F to 375°F (175°C to 190°C). If the oil is too hot, the exterior will burn before the inside is fully cooked. If it’s too cool, the Katsu will absorb more oil and become greasy.
2. Batch Frying: Avoid overcrowding the pan. Fry the Katsu in small batches; this ensures even cooking and prevents the oil temperature from dropping too much.
3. Proper Coating: Before frying, ensure that your Katsu is well-coated in flour, then dipped in egg, and finally covered in panko. Press the panko onto the surface firmly to create a thick, even layer, which will help achieve that delightful crunch.
4. Using the Right Oil: Choose an oil with a high smoke point, such as vegetable oil or canola oil, to achieve the best frying results.
Safety Precautions While Frying
Frying can be dangerous if not handled with care. Follow these safety precautions to ensure a safe cooking environment:
– Use a Deep Pot: When frying, use a deep pot to prevent oil splatter. If frying in a skillet, ensure the sides are high enough to contain any bubbling oil.
– Keep a Lid Handy: Always have a lid nearby to cover the pot in case of an oil fire. Never use water to extinguish an oil fire; instead, use salt or a fire extinguisher.
– Use a Thermometer: An oil thermometer can help you accurately gauge the oil temperature, ensuring safety and consistency in frying.
– Wear Protective Gear: Consider wearing an apron and long sleeves to protect yourself from hot oil splatters.
Assembling the Katsu Bowl
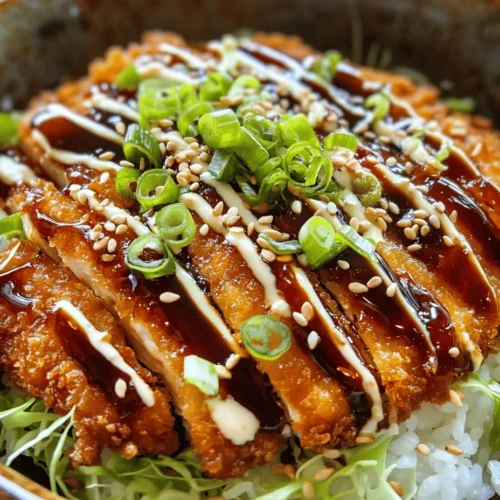
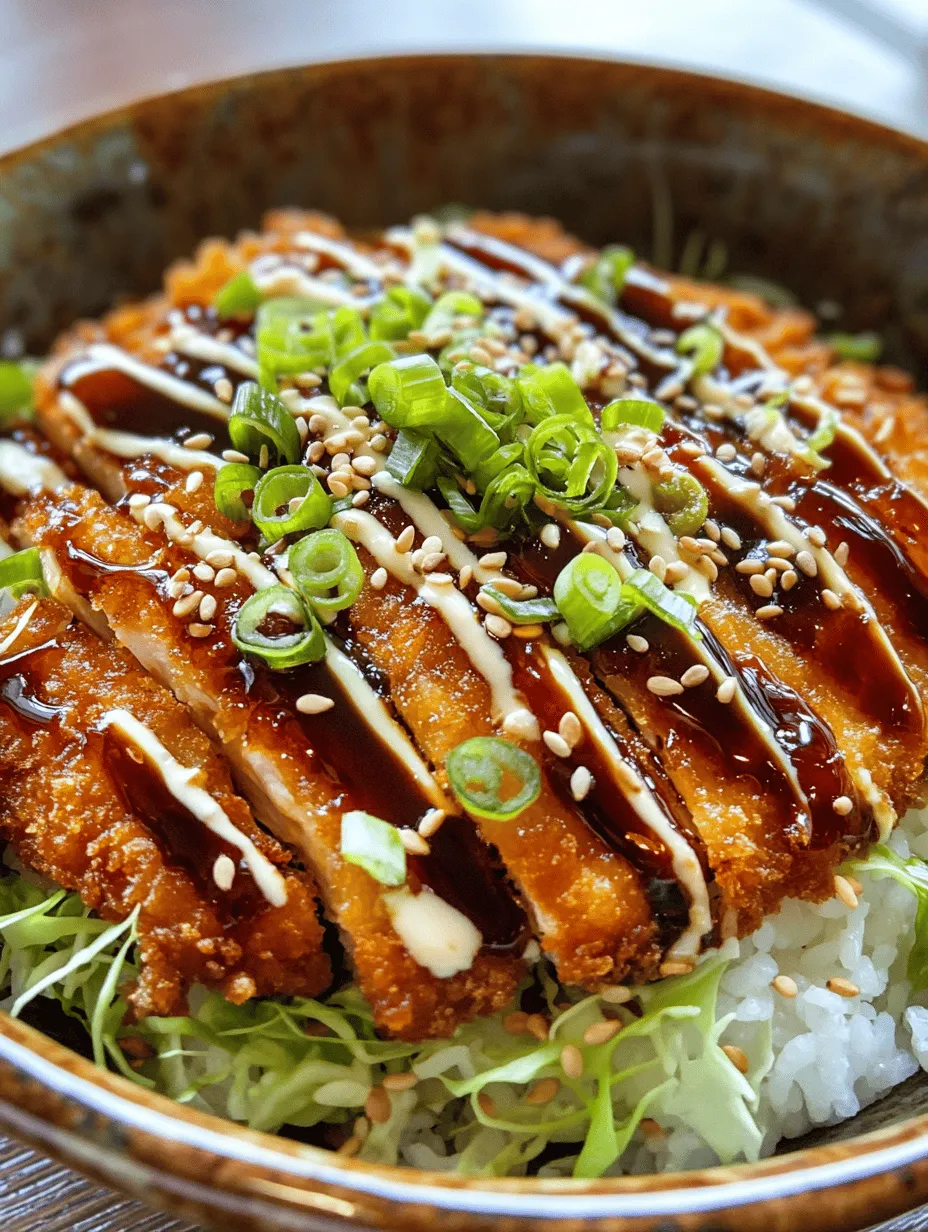
Once your Katsu is perfectly fried, it’s time to assemble your Katsu Bowl for a delightful dining experience. The layering of the bowl is crucial for optimal flavor and presentation.
Layering the Bowl for Optimal Flavor
Begin with a generous serving of steamed rice as the foundation of your Katsu Bowl. The rice will absorb the savory juices from the Katsu and sauce, enhancing the overall taste.
1. Rice: Prepare Japanese short-grain rice for an authentic texture. Rinse the rice until the water runs clear, then cook it according to package instructions. Fluff the rice with a fork once cooked, and consider adding a splash of rice vinegar for a subtle tang.
2. Katsu: Place the crispy Katsu on top of the rice, either whole or sliced into strips for easier eating. This placement allows the rice to soak up the delicious juices from the Katsu.
3. Tonkatsu Sauce: Drizzle a generous amount of Tonkatsu sauce over the Katsu. This rich, savory sauce adds depth to the dish and complements the crispy texture beautifully.
Tips for Serving Rice: The Foundation of the Dish
When serving the rice, consider using a bowl or a deep plate to create height and visually appealing layers. You can also mold the rice with a small bowl to achieve a neat, rounded shape before placing it in the serving bowl.
Positioning the Tonkatsu for Presentation
For the best presentation, position the Tonkatsu slightly off-center on the rice, allowing some of the rice to be visible. This not only enhances the visual appeal but also makes it easy for diners to see the crispy coating.
Garnishing Techniques: Sliced Green Onions and Sesame Seeds
To elevate your Katsu Bowl further, garnish it with sliced green onions and toasted sesame seeds. The green onions add a pop of color and fresh flavor, while the sesame seeds provide a subtle crunch.
1. Sliced Green Onions: Use both the green and white parts for a vibrant garnish. Thinly slice them and sprinkle them generously on top of the Katsu.
2. Toasted Sesame Seeds: Lightly toast sesame seeds in a dry pan until golden to release their nutty flavor. Sprinkle these over the Katsu for added texture.
Incorporating Pickled Ginger: A Traditional Accompaniment
Pickled ginger is a traditional accompaniment to Katsu Bowls, providing a refreshing contrast to the richness of the dish. Serve a small side of pickled ginger atop or beside the Katsu, allowing diners to enjoy it as a palate cleanser between bites.
Serving Suggestions and Variations
Katsu Bowls are incredibly versatile and can be customized to suit various dietary preferences and seasonal ingredients.
Exploring Customization Options for Katsu Bowls
Feel free to tailor your Katsu Bowl to your taste. Here are some ideas for customization:
– Vegetarian Alternatives: For a meat-free option, consider using tofu or vegetable Katsu. Firm tofu can be sliced, coated in panko, and fried just like chicken or pork. You can also use vegetables like eggplant, zucchini, or sweet potatoes for a delicious twist.
– Pairing with Sides: Enhance your meal by pairing your Katsu Bowl with a side of miso soup or Japanese pickles. Miso soup adds warmth and comfort, while pickles provide a tangy crunch that complements the richness of the Katsu.
– Seasonal Variations: Feel free to incorporate seasonal vegetables into your Katsu Bowl. For example, add sautéed bell peppers, mushrooms, or steamed broccoli for added nutrition and color.
Nutritional Information and Health Considerations
While Katsu Bowls are a treat, it’s essential to understand their nutritional content and how to enjoy them mindfully.
Nutritional Breakdown of Katsu Bowls
A typical Katsu Bowl contains a balance of protein, carbohydrates, and fats, making it a hearty meal. Here’s a rough nutritional breakdown for a serving of Katsu with rice:
– Calories: Approximately 600-800 calories, depending on portion sizes and specific ingredients.
– Protein: 25-30 grams from the meat or tofu.
– Carbohydrates: About 80-100 grams from the rice.
– Fats: 25-35 grams, primarily from frying.
Balancing Indulgence with Healthier Choices
To enjoy Katsu Bowls while balancing health considerations, consider the following tips:
– Use Whole Grain Rice: Opt for brown rice or quinoa for added fiber and nutrients.
– Fry Less Often: Instead of frying, consider baking your Katsu for a healthier alternative. Lightly spray with oil and bake until crispy.
– Increase Vegetables: Load your bowl with vegetables to increase fiber and decrease calorie density.
Understanding Portion Sizes and Serving Suggestions
Be mindful of portion sizes when serving Katsu Bowls. A serving of rice should be around 1 cup, while the protein should be around 4-6 ounces. Balancing these portions with plenty of vegetables can help create a satisfying yet healthier meal.
Conclusion: Enjoying Your Homemade Katsu Bowl
Making Katsu Bowls at home is not only a rewarding culinary experience but also an opportunity to explore the flavors of Japanese cuisine. The joy of creating a perfectly crispy Katsu, layering it with flavorful rice, and drizzling it with savory Tonkatsu sauce is unparalleled.
As you take your first bite, you’ll appreciate the crunch of the Katsu, the fluffy rice, and the delightful garnishes, all coming together to create a satisfying meal. Whether you’re enjoying it on a cozy weeknight or serving it at a gathering, your homemade Katsu Bowl is sure to impress.
So gather your ingredients, follow the steps, and indulge in the incredible flavors of this Japanese classic. Don’t hesitate to experiment with your Katsu Bowl, making it uniquely yours, and continue your exploration of the rich and diverse world of Japanese cuisine.